Skip to content

Get an AI key (OpenAI, Anthropic, or Gemini)

Pinners Haven generates on your own AI account. Here's how to get a key, what it costs, and why one key is all you need.

Getting startedVerified October 2026

Screens in this article

Open these alongside the guide. Every screenshot below was captured from exactly these routes.

On this page11 sections
  1. Which provider to pick
  2. Step 1: get the key from your provider
  3. OpenAI
  4. Anthropic
  5. Gemini
  6. What this costs you
  7. Step 2: save the key
  8. Step 3: there is no step 3
  9. When something goes wrong
  10. Key problems
  11. Sources

Pinners Haven writes your pin titles and descriptions and designs your pin images using your own AI provider account. You pay the provider directly at their rates. We add no markup and take no cut.

That means one setup step before anything can generate: adding a key. Without one, as the app puts it, "no project can generate pin titles, descriptions, or images."

This takes about three minutes.

Which provider to pick

Three are supported, and the choice matters more than it looks:

Provider

Text

Images

Notes

OpenAI

Yes

Yes

The straightforward choice

Anthropic

Yes

No

No image API at all

Gemini

Yes

Yes*

*Image generation needs a billing-enabled project

Pick OpenAI unless you have a specific reason not to; the full walkthrough is Set up your OpenAI key, step by step.

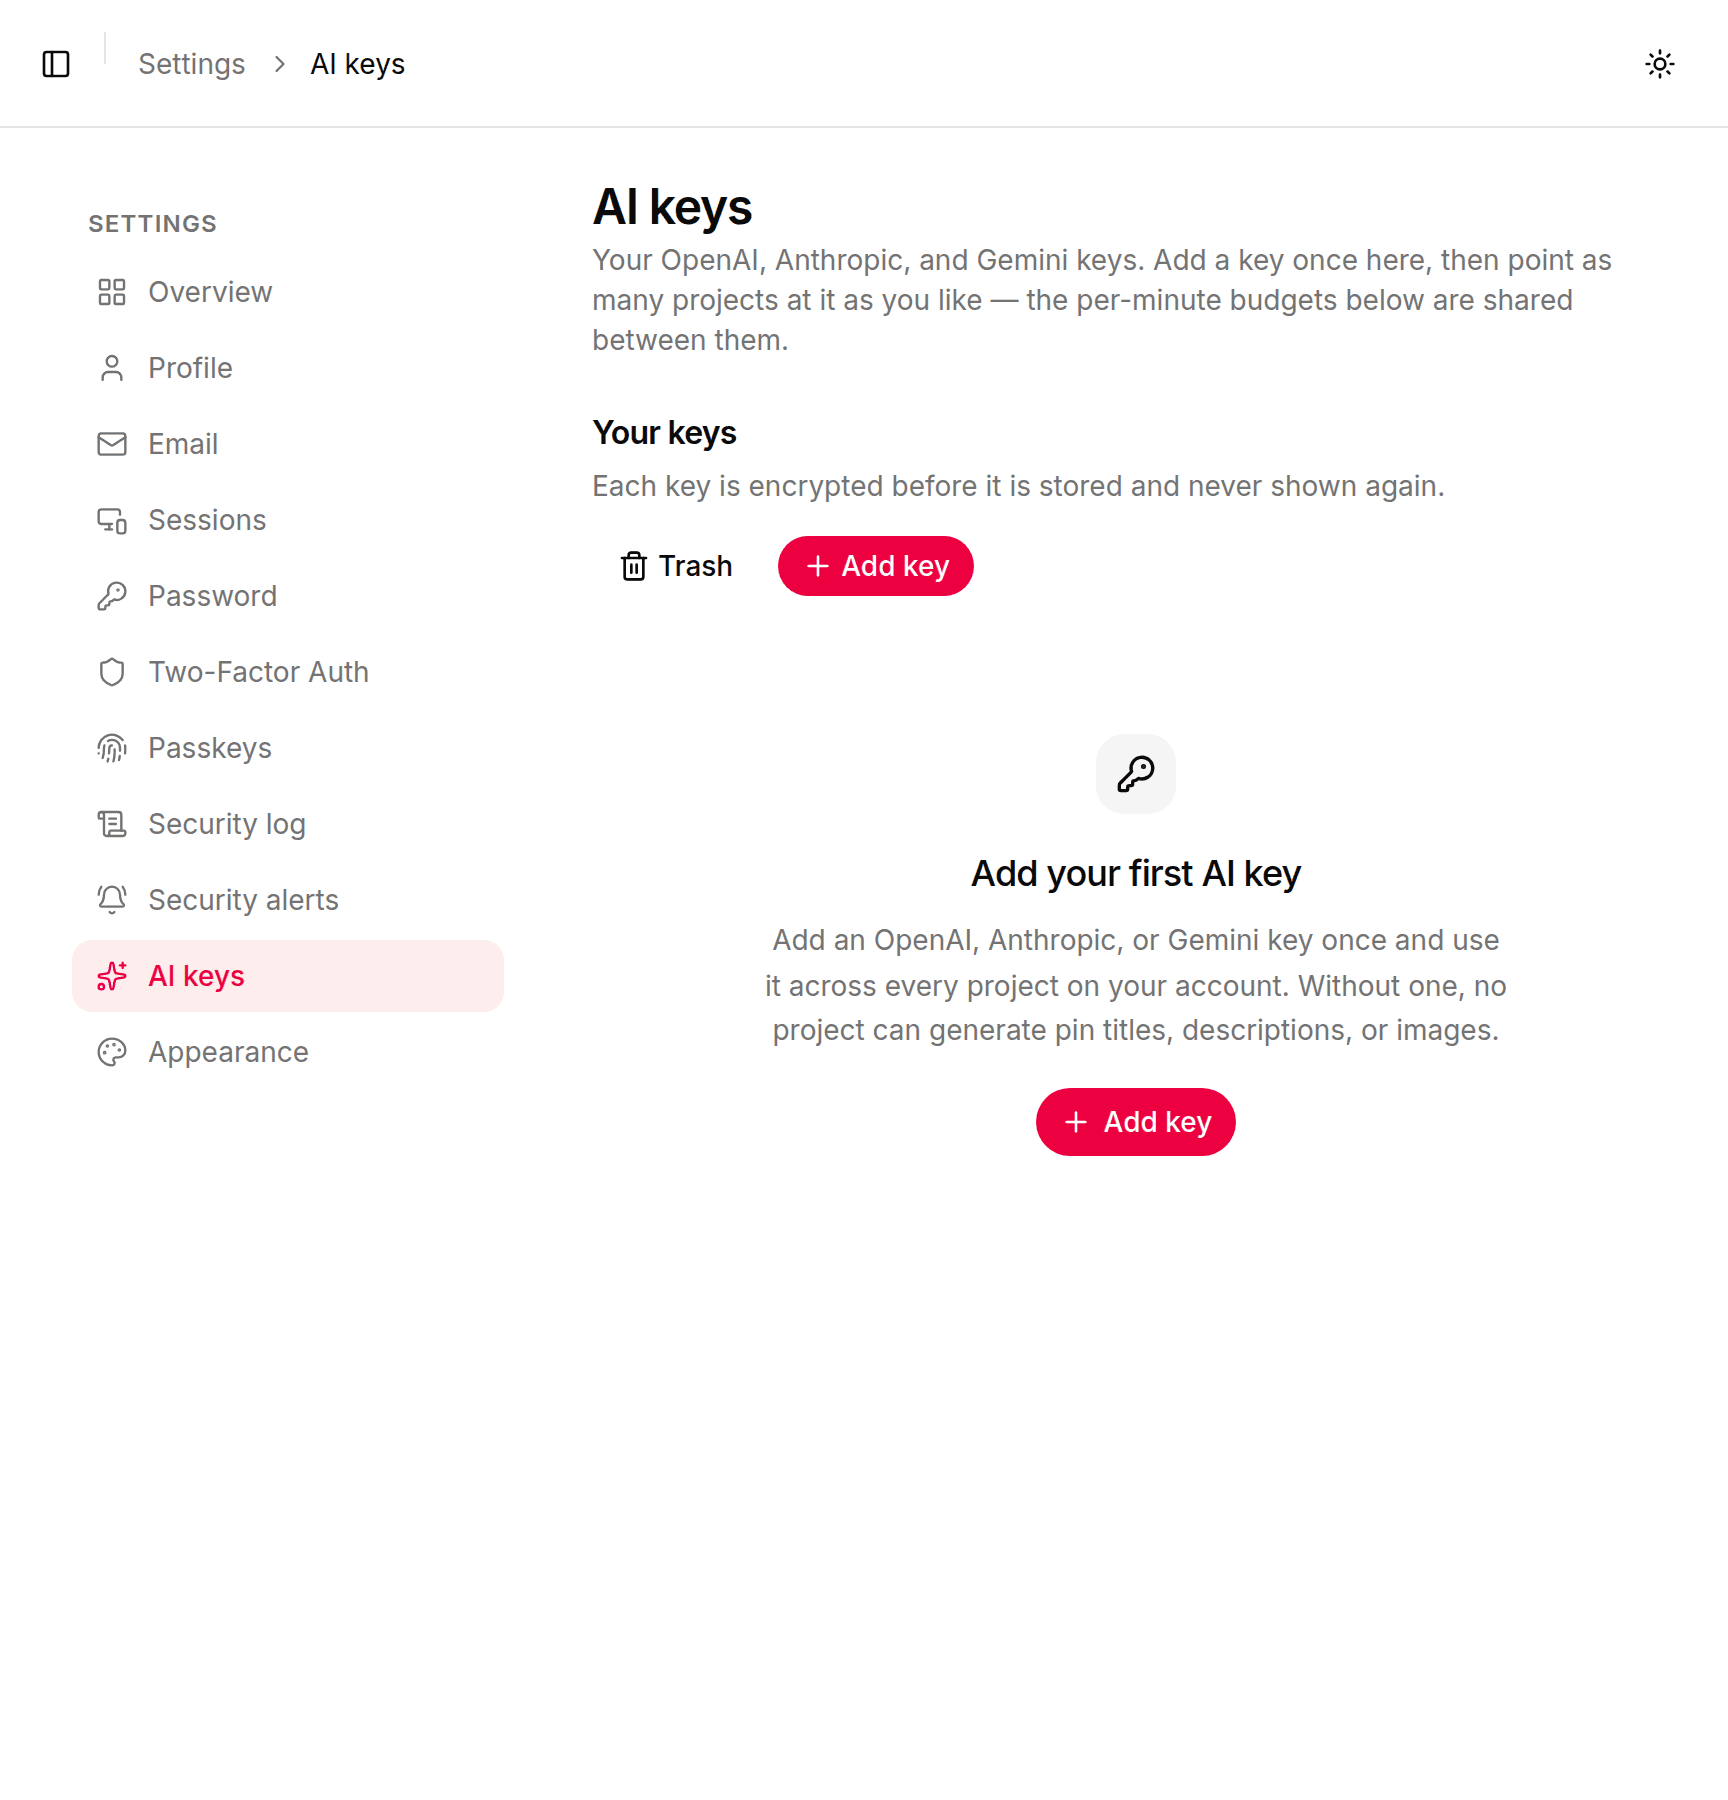
Before you start, Settings → AI keys is empty and says so:

The AI keys page before you add one

Step 1: get the key from your provider

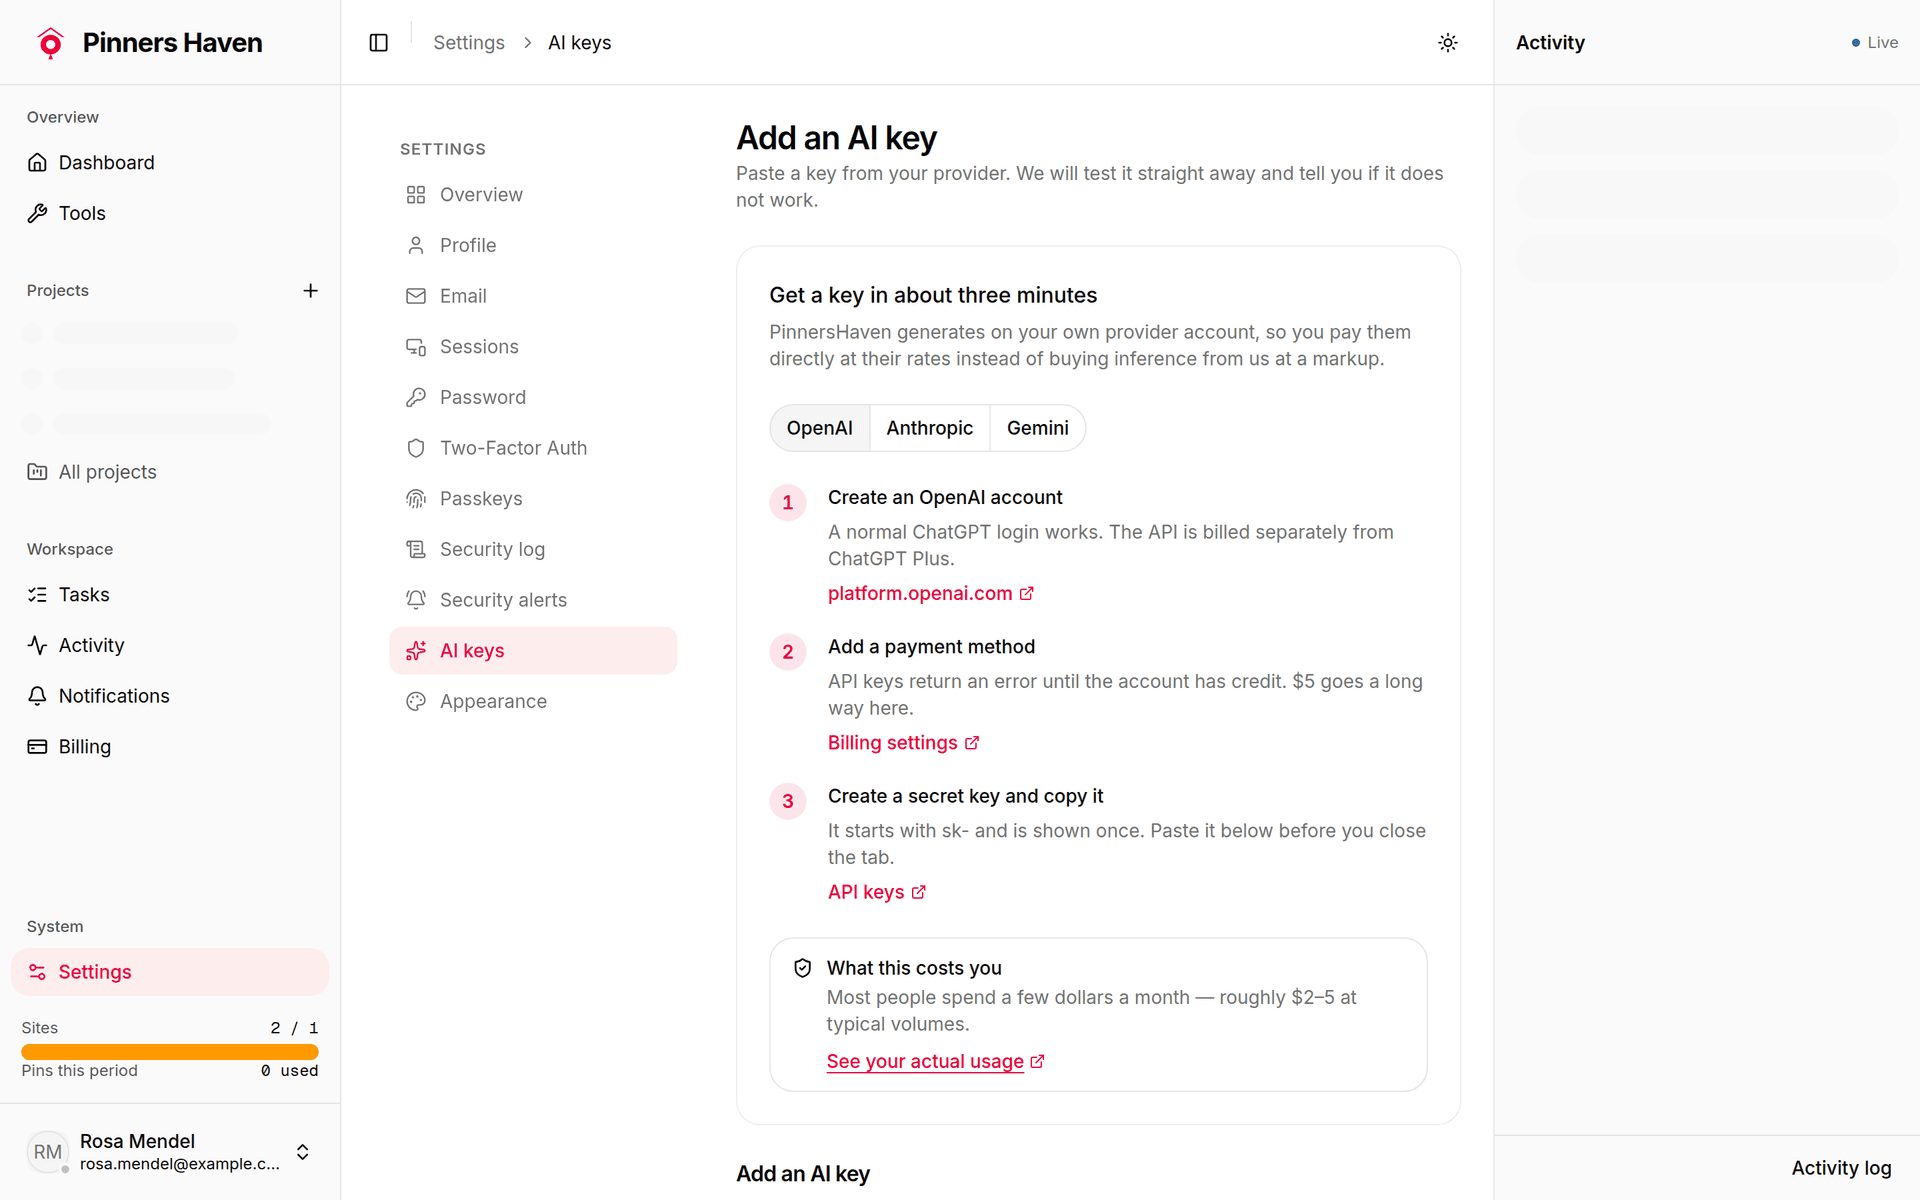
In Pinners Haven, go to Settings → AI keys → Add key (open it directly). The page is headed Add an AI key, and above the form is a walkthrough card, Get a key in about three minutes, with a tab per provider.

The Add an AI key page with the OpenAI walkthrough

Every step in that card links straight to the exact page on the provider's site — not their homepage. Finding the right screen inside a cloud console is most of the friction, so use the links rather than navigating yourself.

OpenAI

OpenAI

  1. 1

    Create an OpenAI Platform account.

    At platform.openai.com. A normal ChatGPT login works, but ChatGPT Plus doesn't include API access.

  2. 2

    Buy credit.

    In Billing. Keys return an error until the account has credit; $5 goes a long way.

  3. 3

    Create a secret key and copy it.

    On API keys. It starts with sk- and is shown once.

OpenAI also asks some accounts to verify their organization before it serves image models. The full walkthrough, with screenshots of OpenAI's own pages, is Set up your OpenAI key, step by step.

Anthropic

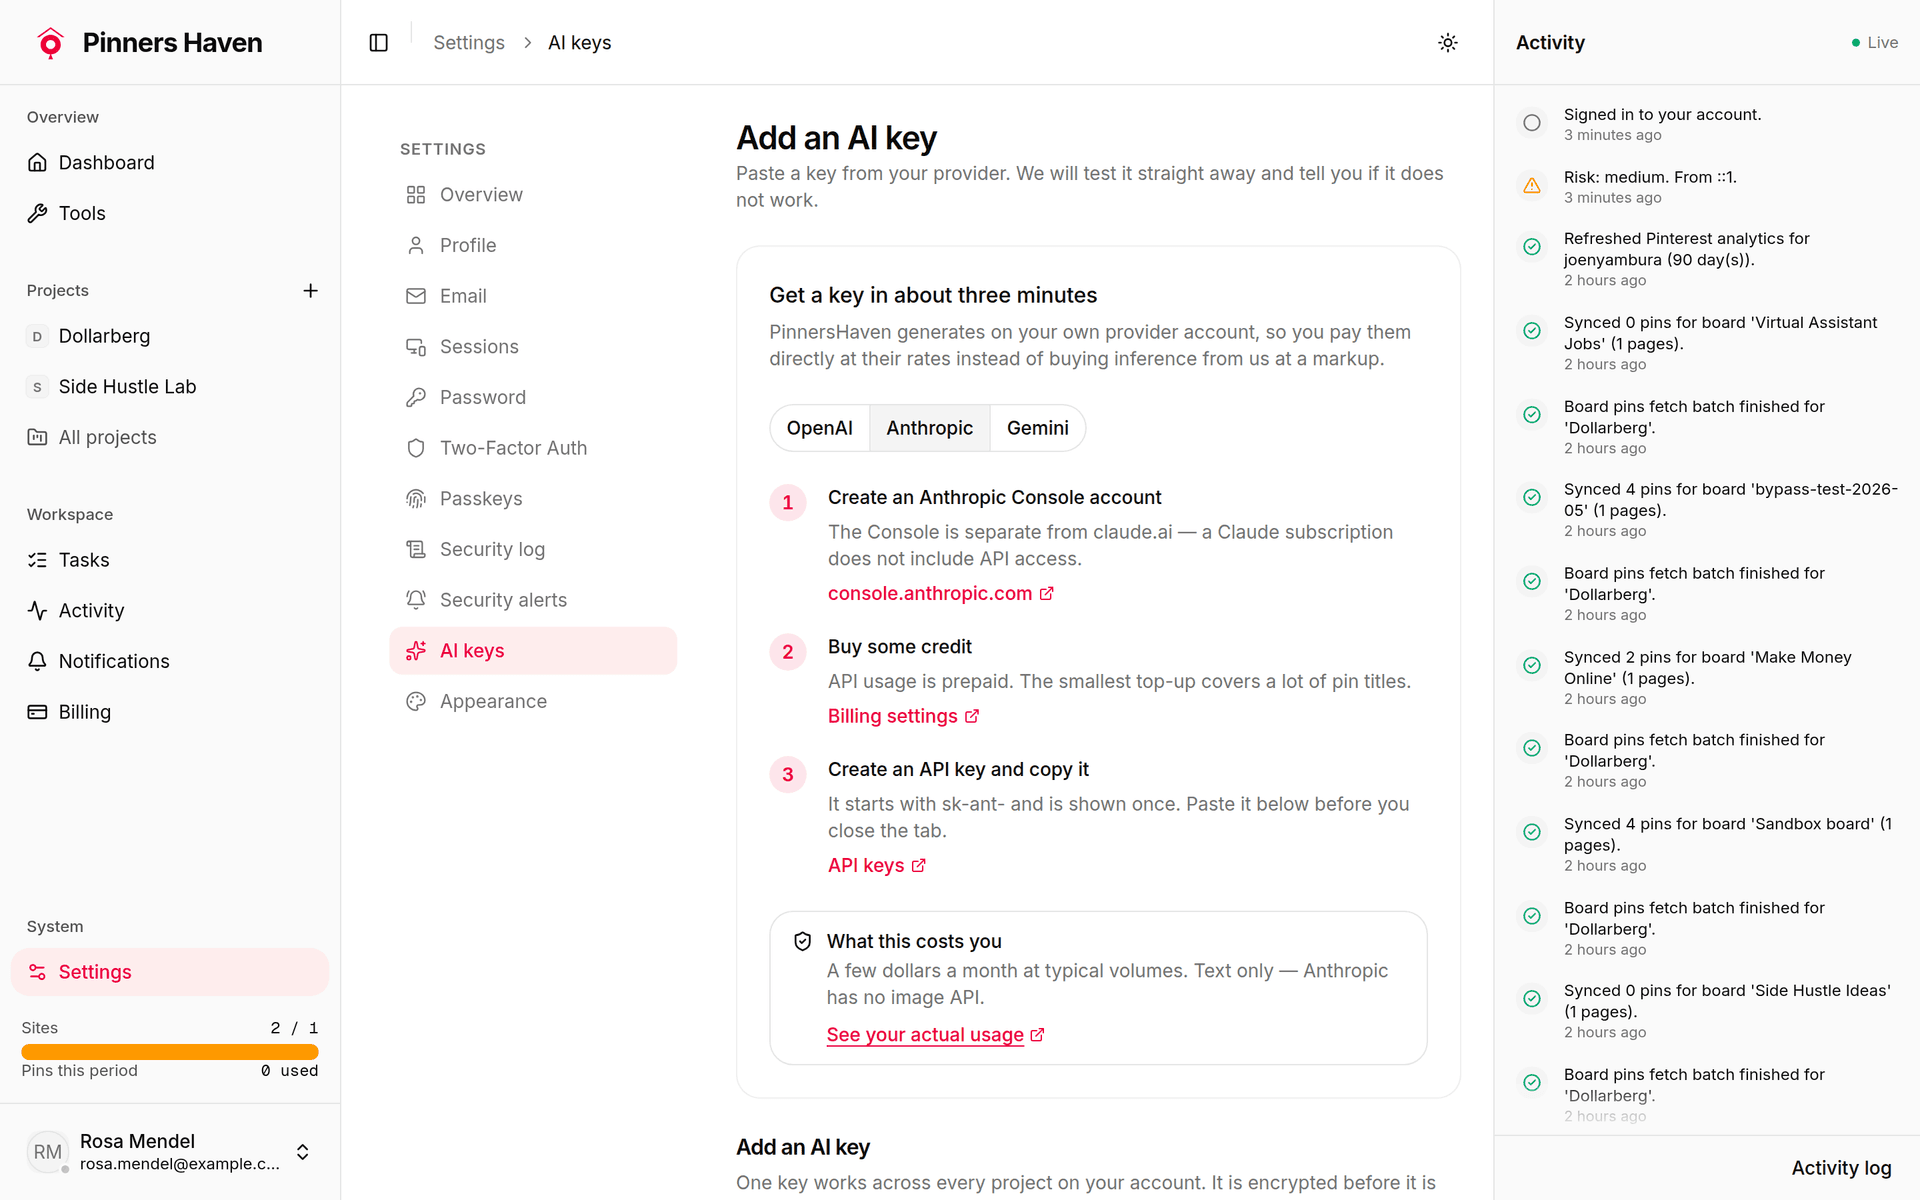
The Anthropic walkthrough

Anthropic

  1. 1

    Create a Claude Console account.

    At platform.claude.com. The Console is separate from claude.ai; a Claude subscription doesn't include API access.

  2. 2

    Buy some credit.

    In Billing. API usage is prepaid.

  3. 3

    Create an API key and copy it.

    In API keys. It starts with sk-ant- and is shown once.

Gemini

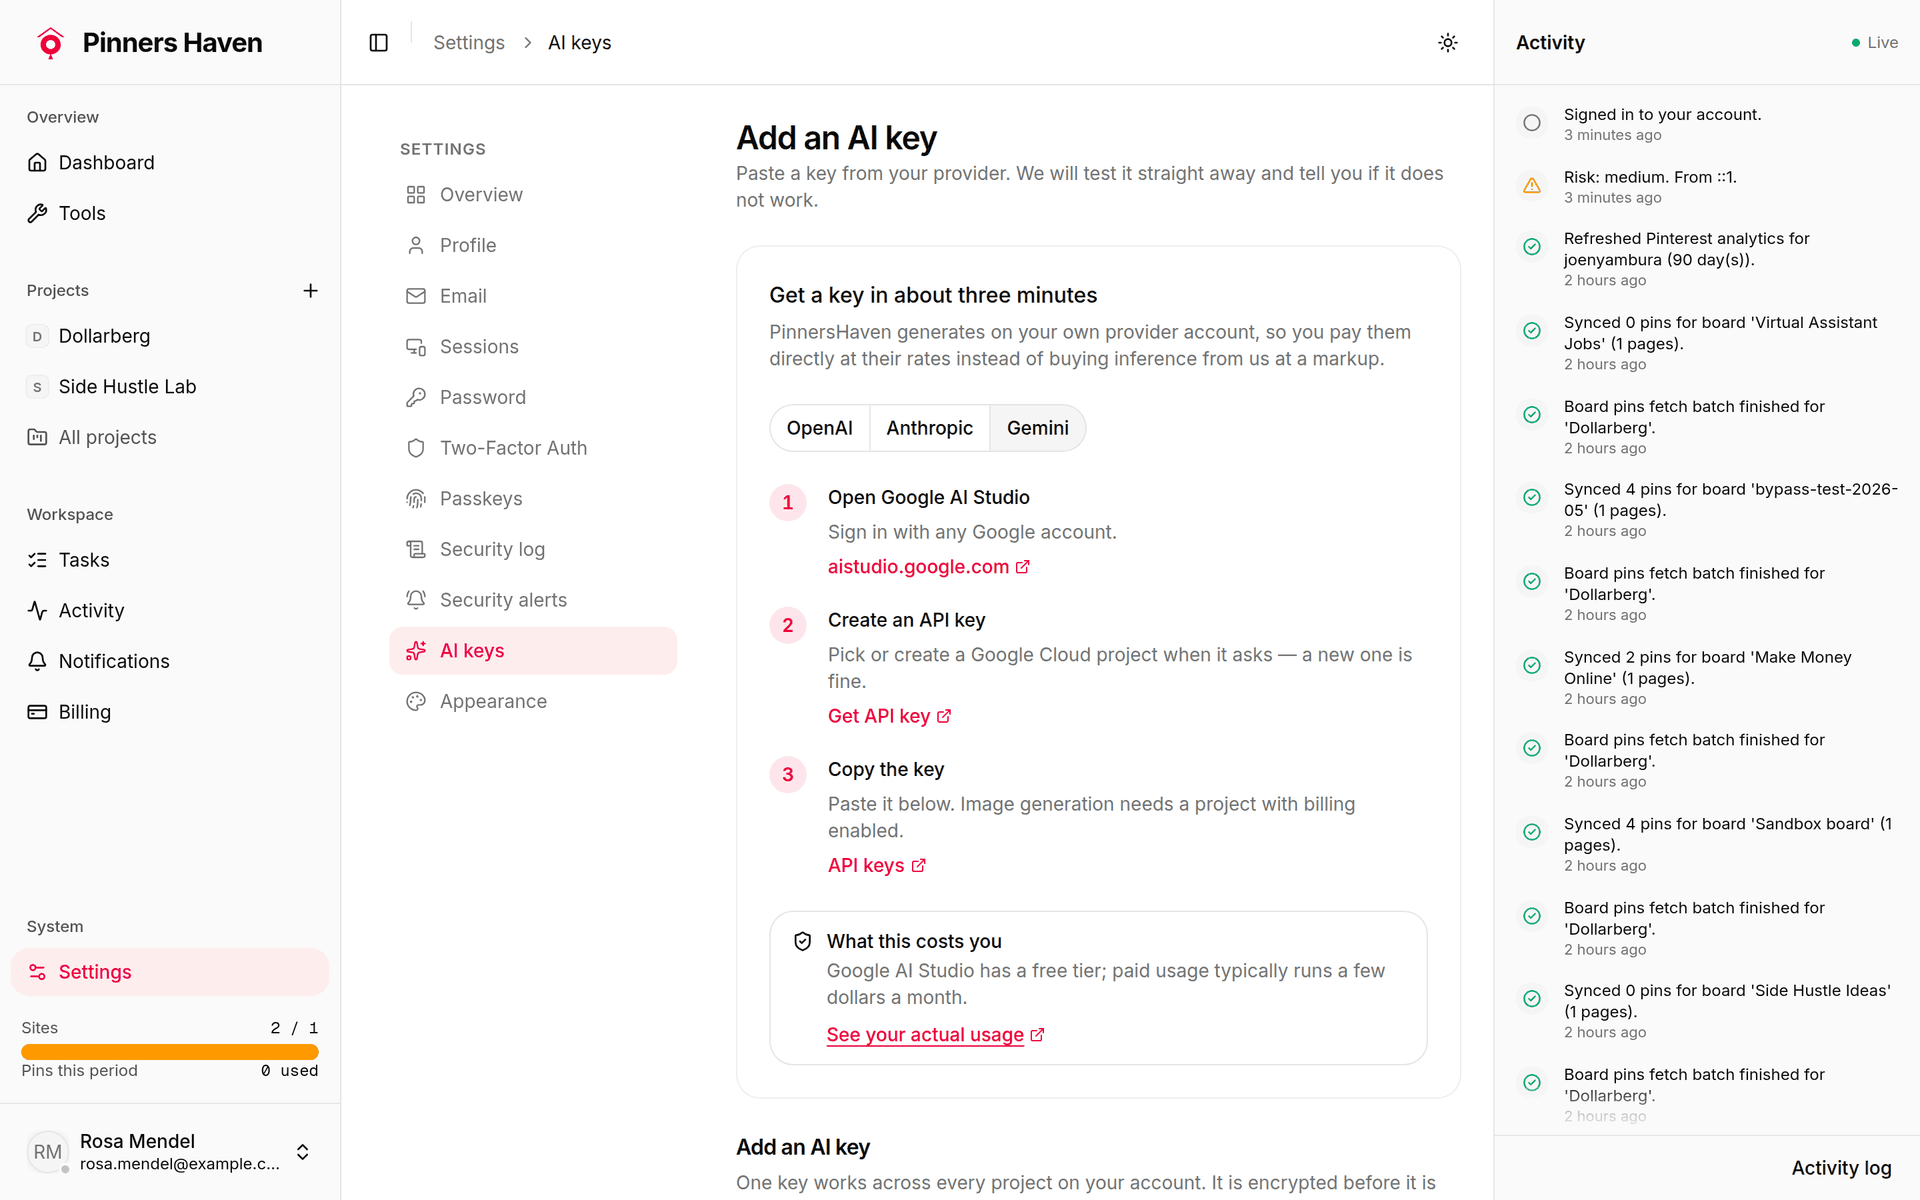
The Gemini walkthrough

Gemini

  1. 1

    Open Google AI Studio.

    At aistudio.google.com, signed in with any Google account.

  2. 2

    Create an API key.

    On the API keys page. Every key belongs to a Google Cloud project; a new one is fine.

  3. 3

    Turn on billing for images.

    Gemini's image models have no free tier, so image generation needs a project with billing enabled.
What this costs you

The bill is yours, paid to the provider, and it moves with how much you generate. The app's own figure for OpenAI:

Step 2: save the key

Back on the Add an AI key page, fill in the form below the walkthrough:

  • Provider — pick the one that issued your key. Note the warning: "You cannot change this later — a key belongs to the provider that issued it." If you pick wrong you delete the credential and add it again.

  • Name — "Only you see this. It is how you will pick this key on a project." Something like Main OpenAI key.

  • API key — paste it. "Pasted once and encrypted. We will test it as soon as you save."

  • Organization ID (OpenAI only) — leave empty. "Only needed if your OpenAI account belongs to several organizations."

  • Base URL — leave empty unless you route through a proxy.

  • Titles and descriptions — leave on. This lets projects use the key to write pin text.

  • Text requests per minute — the default is fine. This budget is "shared across every project using this key — your provider counts them against one account, so projects split this budget rather than each getting it in full."

  • Images (OpenAI and Gemini only) — leave on. This lets projects use the key to generate pin images. Images per minute works like the text budget; the default is fine.

Press Add key.

Saving doesn't check the key — the app tests it just afterwards and the badge tells you where that got to. Once it reads Connected, you're done.

Step 3: there is no step 3

This is the part people expect to be harder than it is.

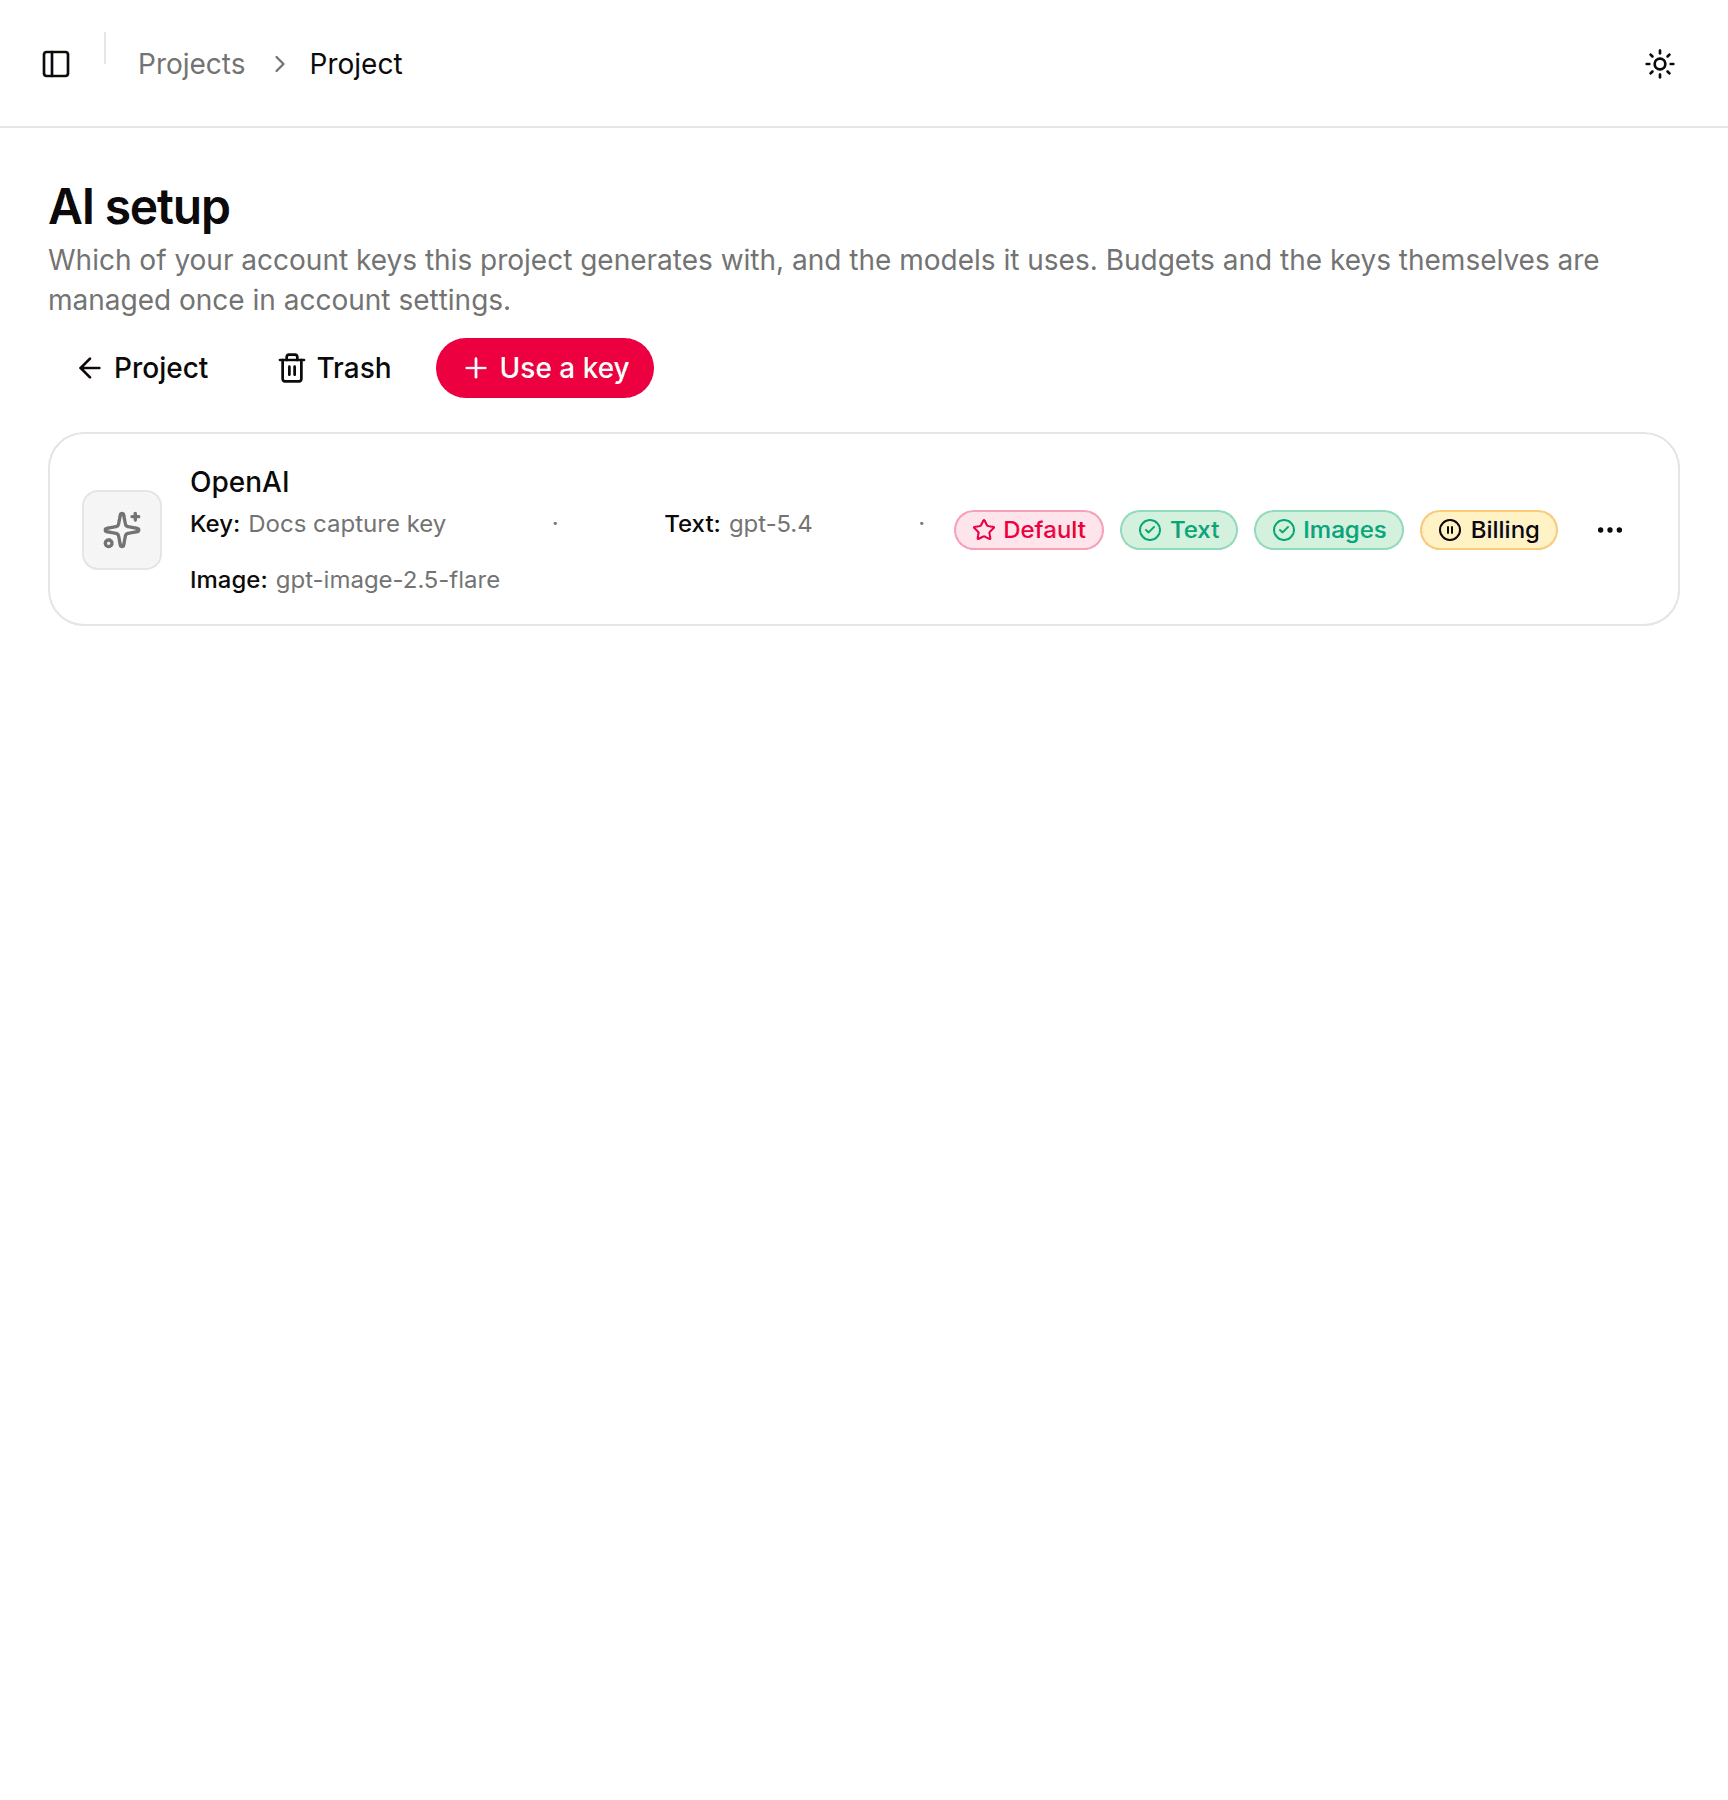
Adding one key is the whole job. When the key passes its test, it becomes your account default and every project that doesn't already have one adopts it automatically — including projects you created before adding the key. You do not have to visit each project and point it at the key.

The project's AI page showing it already bound to the key

You can confirm it on any project's AI setup page, near the bottom of the project sidebar. It shows which key that project generates with and the models it picked, badged Default, Text and Images. As the page explains: "Budgets and the keys themselves are managed once in account settings."

The Use a key button on that page is for later — when you have more than one key and want a specific project to use a specific one, or you want to override which models it uses. On a single-key account you can ignore it.

When something goes wrong

These are the key-specific messages. Troubleshooting covers everything else, and the OpenAI setup has the OpenAI-specific fixes.

Key problems

My key shows "Failed" instead of "Connected"

Saving doesn't check the key; the app tests it just afterwards. It reads Untested, then Testing, then settles on Connected or Failed, and you get an email either way. A failed key stays switched off. To see why, open the key's menu and choose Test connection: it shows the provider's own words. Almost always the key was copied incompletely, the account has no credit yet, or the key was revoked. Fix it at your provider and test again; it switches itself back on once a test passes.

"Your AI key can't make pin content"

This shows on your dashboard, marked Critical, and the key carries a Billing badge. The line under it names the reason, most often "[provider] reported no credit on it". Top up at the provider, then open the key's menu and choose Test connection. As the dashboard says, "Every project uses it, so fixing it once fixes them all."

"This [provider] key is already saved on your account."

You already have a key for this provider. Bind a project to the existing credential instead of adding the key again.

"The [provider] provider does not support image generation. Use a different credential."

You're on an Anthropic key and something asked for an image. Add an OpenAI or Gemini key for image work; you can keep the Anthropic one for text.

"Rate limit reached for [capability] on the [provider] credential. Retry in [N] seconds."

Your provider is throttling you, not us. It clears on its own after the stated time. If it keeps happening, lower the per-minute budget on the key, or check your provider's account limits.

Sources

Checked October 2026. Provider consoles change; if one disagrees with this page, the console is right.

Did this get you unstuck?

One tap. It tells us which article to re-verify next.

Start free